
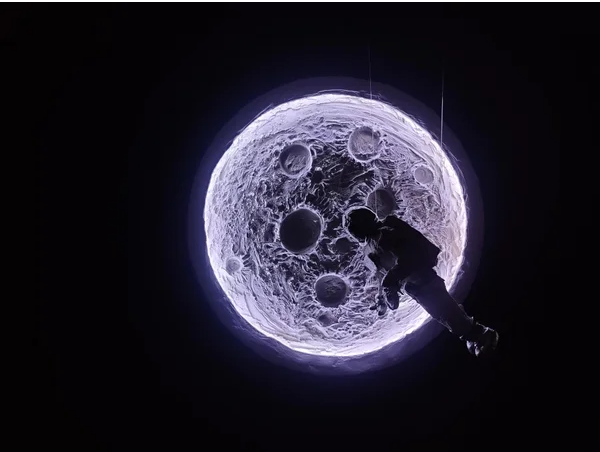


Prepare to embark on a creative journey to the moon with this captivating DIY project! Our Illuminated Moon Diorama with Astronaut is an imaginative and eco-friendly way to showcase your love for space. Utilizing recycled materials like cardboard and egg tray mache, along with the magical glow of LED lights and the texture of plaster of Paris, this project brings the lunar surface to life. Ideal for paper and cardboard contests, this diorama not only showcases your crafting skills but also emphasizes sustainability and innovation. Follow along to create your own piece of the cosmos right at home!
Supplies
- Cardboard
- 3mm Sunboard
- Pencil
- Scissors or craft knife
- Glue
- Plaster of Paris (PoP)
- GI Wire
- Paint (white, gray, and black)
- Paintbrushes (various sizes)
- 12V LED strip
Step 1: Layout the Foundation


- Cut two cardboard circles. One about 1 inch bigger in radius than the other.
- Stick them together with craft glue.
Step 2: Combine Circles


- Cut 1 inch width or sunboard strips.
- Encircle the cardboard with the strip using superglue.
Step 3: The Light Setup


- Fix 12v LED strips around the circle.
- Make a small hole and get the power-wire out from the side-bottom.
- Cover the strip with 1 inch width of cardboard’s flat strip.
- Fix the strip with masking tape.
Step 4: Applying Fillers and Tape


- Secure and strengthen all the surface using tapes
Step 5: PoP Application


- Apply plaster of paris (POP) on the back of about 1 cm depth.
- Use a spreader to spread the plaster evenly and let it dry completely.
- Use another layer, spread and dry.
- Turn it front and apply a layer of plaster of about 1-2 cm height and don’t let it dry this time.
Step 6: Creating Craters and Textures


- To create the craters I used different size of bottle and jar caps.
- Pressed the caps onto the plaster, and created different sizes of craters.
- With help of fingers created textures around the craters.
- With help of a mini hole presser, made small pricks on the surface and created the rough textures on the moon.
Step 7: Sand the Dry PoP


- After the plaster dried, used a 220 grit sandpaper and lightly sanded the sides.
Step 8: Installing Hanging Hook


- Installed a hook to hang the project on the wall.
Step 9: Paper Mache Making


- Took an egg tray, crumbled and soaked in water overnight.
- Strained the water from paper pulp in a cloth.
- Mixed the pulp with a tbsp of craft glue and a tbsp of plaster of paris.
Step 10: The Astronaut Making


6 More Images
- An armature was made using GI wire.
- The paper mache was used to sculpt the astronaut.
- POP was used to add little details.
- Kept for 48 hours to let it dry completely before applying color.
Step 11: Colour It Up


3 More Images
- Using acrylic colors the astronaut was painted.
- First a white base color was applied, and dried.
- Areas like the helmet, gloves, boots, belts were highlighted with sliver.
Step 12: Hanging the Astraonaut


- Finally the astronaut was hanged using a thin fishing line.
Step 13:

Congratulations on completing your Illuminated Moon Diorama with Astronaut! You’ve skillfully transformed simple, everyday materials into a breathtaking representation of lunar exploration. This project not only enhances your crafting abilities but also demonstrates the potential of recycling and upcycling in creating beautiful, functional art. By participating in the paper and cardboard contest, you’re showcasing your creativity and advocating for eco-friendly crafting practices. Display your diorama proudly, knowing you’ve made a stellar contribution to both the art world and the environment. Happy crafting, and keep reaching for the stars!


