

As an enthusiastic student, I’ve embarked on an exciting project that merges my passion for art with my fascination for various materials, all while being environmentally responsible by using scraps.
In this tutorial, I’ll guide you through the process of creating stunning text art by combining different materials: wood, metal, and 3D printing. Through this project, I aim to explore the unique characteristics and potential of each material, blending traditional craftsmanship with modern technology to produce visually captivating and innovative text art pieces.
The highlight of this project is creating an art piece that focuses on the number 10, which represents a unique source of inspiration. The number 10 symbolizes the perfection of creativity, combining different materials into beautiful works of art.
Join me on this creative journey as I share step-by-step instructions and insights on how to bring these diverse elements together into a harmonious work of art.
Supplies

Materials and tools that we’ll need for this project:
Autodesk Fusion
3D Printer and slicer
PLA Filament (black and orange)
Small Perf board (4 x 6 cm)
7 green LEDs
Coin cell battery 3V
Soldering gun
Solder
Rotary tool
Drill
Orbital sander
Miter saw
Angle Grinder
Aluminum Rod
Punch
Lumber 2×4
Lumber 1×12
Step 1: Design Idea

To begin, I drafted a sketch design for the number 10 that I envision for this project. This creation will seamlessly integrate the materials of wood, metal, and 3D printing.
Step 2: 3D Designing for Number 1


Each digit, 1 and 0, incorporates accurately 3D-printed components, which designed in Fusion. First, in the sketch phase, I created a shape of trapezoid for the upper segment of the numeral one (refer to the images for precise measurements). Afterwards, I extruded to form the desired 3D structure.
Step 3: 3D Designing for Number 0


3 More Images
For the numeral 0, I crafted a semi-circular form using 3D design techniques. In the initial sketch, after forming the semi-circle, I incorporated a rectangular cutout to accommodate an LED fixture. After finishing with the sketch, I continued to extrude the design (refer to the images for precise measurements).
Step 4: Print the 3D Design


Save the model to STL files and export it. We should have 2 parts for this project. Print it with 0.2 mm of layer height, 50% infill with triangle pattern, with brim and without support. To achieve the amazing infill design, make sure the wall and top and bottom thickness of the shell is at zero mm.
Step 5: Finishing the Printing


After extensive hours of printing, it’s time to refine any imperfections until the surface is flawlessly smooth.
Step 6: Preparing the Metal Rod


While the 3D printer was in operation, I proceeded to retrieve my angle grinder and began cutting the aluminum rod into precise 20mm segments. I required only five of these segments for this project.
Step 7: Marking the Lumber


For the 1×12 lumber, I use a compass to make a circle with a diameter of 150 mm and make it half. For the 2×4 lumber, make a mark approximately 90 mm.
Step 8: Wood Part for Number 1


Initially, cutting the 2×4 lumber since it is more straightforward to handle. Align the 2×4 against the fence and proceed to make precise cuts through it.
Step 9: Wood Part for Number 0


Cut across the semicircle first. At this stage, things started to get complicated. Since I don’t have a router, I used my miter saw to trim the edges, while eyeballing the angle to be as precise as I can. The most challenging part is making the groove for the perf board. I started to cut the groove while sliding it back and forth. Needed to be extra careful not to overcut the groove (it will look bad if that happens) and of course, not to touch the blade for safety reasons.
Step 10: Polishing the Wood


Sand all the wood’s surface until smooth. Next, I carefully sand the semicircle to ensure it aligns with my marking on the wood.
Step 11: Make Holes for the Rods


For the lumbers, I needed to use a center punch to ensure accuracy and avoid slippage during drilling. Start drilling from the smallest bit until achieving the desired one. For the 3D printed parts, I used a soldering iron to create an initial hole, and then gradually enlarged it until matched with the diameter of the rod.
Step 12: Create the LEDs


Arrange the LEDs to the perf board (refer to the image) and start soldering them. Be careful not to let the positive and negative touch each other.
Step 13: Assembles


Phew, after all that hard work, now it’s time for the fun part, assembling! Start by inserting the rods into the holes of the wood first. Then install the LEDs into the wood. Finally, assemble the 3D printed into the wood.
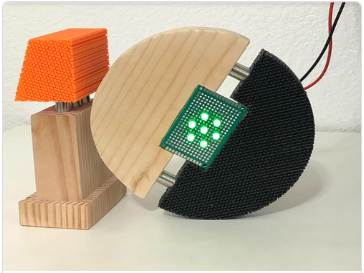
Step 14: Finish Project

Grab the coin cell battery then boom! And just like that, the LEDs lights up and displaying our hard work. Voila, the project is finished.
It proves it’s insane that with scraps around your house, you can create this masterpiece to elevate your home to the next era. Now, it’s your turn to try it! Wish you the best!


