
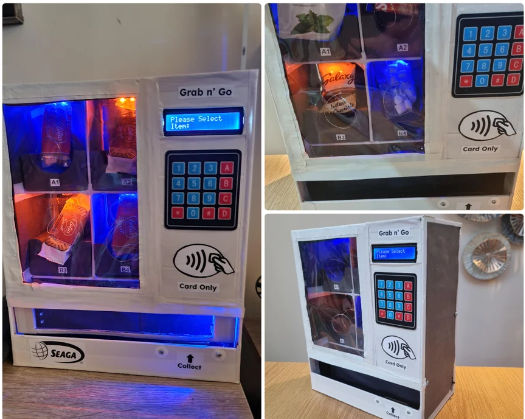
Craft Your Own Mini Vending Machine Out Of Cardboard!
Dive into the magic of paper as we delve into the materials behind this captivating creation: sturdy cardboard, vibrant colored paper, and intricately designed printed stickers. But this isn’t just any ordinary vending machine – it’s a miniature marvel, driven by the powerful Arduino microcontroller. Yes, you heard it right – this paper-based wonder functions just like a real vending machine!
With space for up to four snacks (and potential for expansion with a bit of tinkering), this desktop-sized delight doubles as a charming decorative piece that commands attention. Crafted using humble supplies such as potato starch glue, silicone adhesive, electrical tape, and trusty duct tape, it seamlessly blends practicality with visual appeal.
Whether you’re a student, a hobbyist, or simply enthralled by cardboard contraptions and electronic wonders, this mini vending machine promises an enjoyable project. It embodies a perfect fusion of creativity, functionality, and sheer delight.
Feel free to personalize your creation with unique color schemes, explore different designs, and share your own step-by-step guide. Let the crafting begin – and may your adventures in paper engineering bring endless joy!
Supplies
For your custom vending machine project, you will need the following supplies:
Here’s the comprehensive list of materials used for your custom vending machine project:
Structural and Decorative Materials:
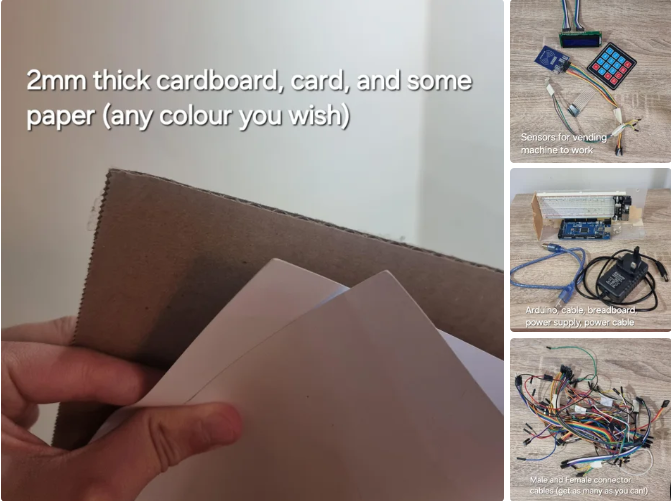
- Cardboard: Preferably 2mm thick for a sturdy, recycled option.
- Card (any color): Used for color accents and customization.
- Paper: Ordinary and colored (e.g., black), for various design elements.
Electronic Components:
- Arduino Microcontroller: Central unit for controlling the vending machine.
- RFID Module: For identification and access control.
- LCD Display: Provides visual feedback and user interface.
- RGB LED: Offers colorful indication and status display.
- Membrane Keypad: Input interface for user interactions.
- Female and Male Connector Wires: Used for wiring connections.
- Breadboard: Prototyping platform for electronic circuits.
- Arduino Download Cable: For programming the Arduino.
- Arduino Plug: Powers the vending machine.
- LEDs: Four LEDs (e.g., 2 blue, 2 orange) for additional visual indicators.
- DC Motors and Motor Drivers (or alternatives like 360-degree servos or stepper motors): Used for dispensing snacks with torque and control considerations.
Tools:
- Scissors and Cardboard Knife: Cutting tools for materials.
- Pen, Pencil, Ruler: Basic tools for marking and measuring.
- Silicone Glue or Hot Glue Gun: Adhesive for strong bonds.
- Glue Stick: Attaches paper and cardboard surfaces.
- Electrical Tape and Duct Tape: Used for insulation and assembly.
- Plastic Sheet: Acts as the front ‘glass’ panel.
- Spare Screws: Additional fasteners as needed.
- Small Hinge: Used for the back door.
- Thin Metal Wire: Various purposes, such as mechanical linkages.
- Double-sided Foam Tape: Mounting components securely.
Additional Recommendations:
- Use whatever materials you have available for customization and expansion.
- Consider adding more sensors or snack dispensers for enhanced functionality.
This comprehensive list ensures you have all the necessary components and tools to build and customize your own functional and visually appealing vending machine project.
Step 1: Design the Vending Machine Using Fusion 360
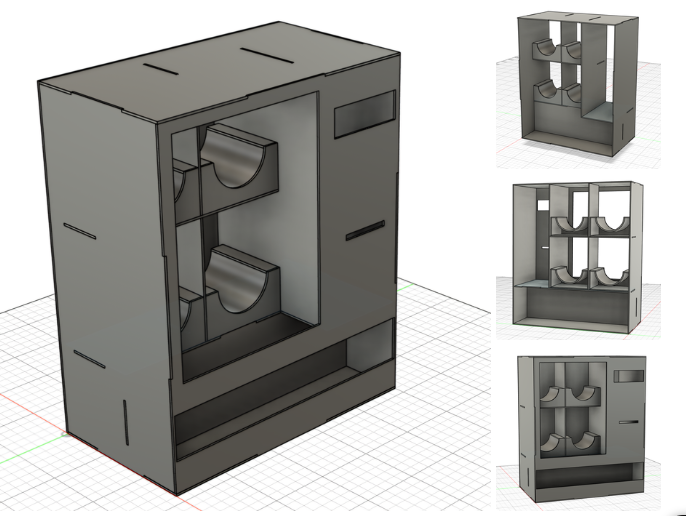
This step involves using 3D software to visualize your vending machine design. I chose to include 2 rows and 2 columns for snacks, as this configuration fits my needs perfectly and suits the size I envisioned. When creating your own vending machine, it’s important to consider the following factors:
- Number of Snacks/Items: Decide how many items you want your vending machine to hold. This determines the size and layout of the compartments.
- Available Electronics: Take stock of the electronic components you have access to. This includes items like sensors, displays, and actuators that will influence the functionality of your vending machine.
- Size: Determine the dimensions of your mini vending machine. Consider where you want to place it (e.g., on a desk, shelf, cabinet) and ensure it fits comfortably within that space.
- Cardboard Availability: Assess how much cardboard you have on hand or can easily acquire. This will dictate the overall structure and robustness of your vending machine.
- Desired Electronics: Plan which specific electronics you want to incorporate based on functionality and design requirements. This could include motors for dispensing, sensors for detection, or lights for visual feedback.
I’ve included my CAD file as a reference, but I strongly encourage you to create your own design tailored to your preferences. Designing from scratch can be more engaging and allows for greater customization. Make sure to double-check the dimensions of your electronic components to ensure they fit accurately within your design.
Step 2: Lay the Parts Flat in Fusion 360 Using the Arrange Tool
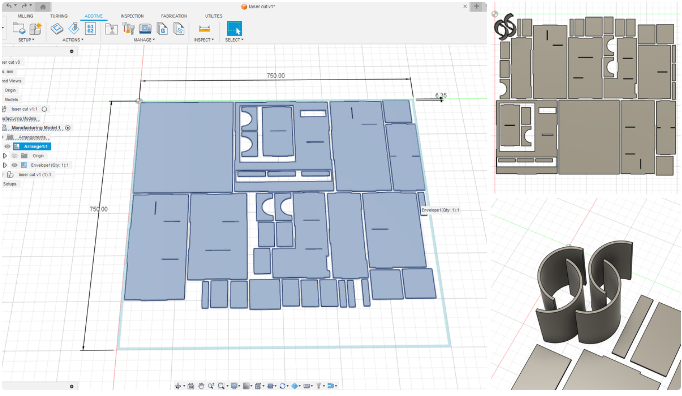
In this step, the goal is to efficiently arrange all the components flat in your 3D software to visualize and optimize the use of cardboard. Here’s a structured approach to achieve this:
- Save Your File: Ensure your current design file is saved to avoid losing any progress.
- Arrange Tool: Navigate to the top menu and select “Modify.” From the dropdown options, choose “Arrange.”
- Flatten Components:
- Select all the parts of your vending machine that can lay flat. These should be individual components in your CAD software.
- Use the arrange tool to lay them flat on a specified grid or plane within your workspace. This helps you visualize how much cardboard you’ll need and how best to utilize it.
- Measurement: Use the inspect tool or measuring tools available in your software to determine precise measurements of the flattened parts. This ensures accuracy in cutting cardboard and assembling the vending machine.
- Considerations for Curved Parts: Some components, such as curved parts for the snack dispenser, may not flatten completely. For these, measure them separately and consider their spatial requirements in your design.
- Additional Guidance: If you’re new to using the arrange tool or need further clarification, watching a tutorial video can be very helpful in understanding how to effectively use this feature in your specific CAD software.
By following these steps, you’ll be able to plan and optimize the use of cardboard for your vending machine project, ensuring efficient use of materials and a well-executed design process.
Step 3: Measure and Cut the Cardboard to Size
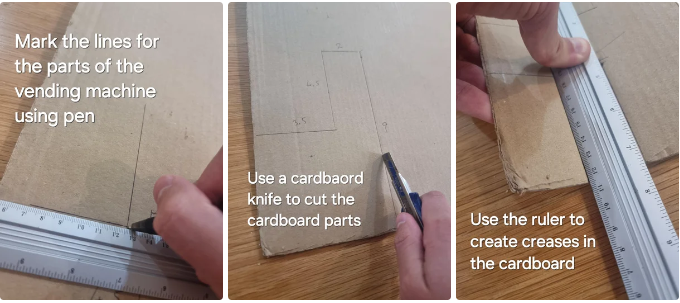
This step involved using scissors and cutting knives so please be careful and ask an adult to help you if you are a child. Here are the steps to cut your minifridge parts out:
- View the CAD flat pack you made earlier and determine the correct measurements (alternatively you could create a DXF file and print it out and stick it onto your cardboard to be even more precise).
- Then, use a ruler to measure the size of your parts and sketch with a pen the shapes.
- Use scissors or a cardboard knife to cut out the part ( I recommend placing a cutting board underneath your cardboard even though I didn’t do so).
- For the curved parts, use your ruler to bend the parts into shape.
Once you cut out all of your vending machine parts, it is time to cut out paper of the same sizes which will be used to cover the parts. You may wish to cut out 2 paper parts for either size of the cardboard.
Now gather your tape and glue and get ready for the next step.
Step 4: Assemble, Wrap in Paper, and Insert Electronics
This is quite a lengthy step so be careful and double check everything. In this step you need to assemble your vending machine using glue and tape, then assemble the snack dispensing modules, and finally start placing the electronic components into the correct places.
Vending machine assembly:
- Get the necessary parts for the vending machine.
- Using a glue stick, apply the paper parts onto the cardboard parts.
- Then stick together the cardboard parts using a hot glue gun or silicone glue. Make sure you wait for long enough to allow the glue to dry.
- Once done, apply duct tape and electrical tape onto the vending machine as you wish. I went for a white and black design with white duct tape and black paper on the sides and inside to keep the design simplistic and aesthetic.
- Finally, do not stick the front transparent plastic on yet, do it once everything else is placed since it will be easier to place the snack dispensers in with an open front.
- Attach hinges to the inside, I made mine using portrait hangers and some screws but I suggest you use proper hinges just for structural integrity.
- Now you can attach your back door to the vending machine. You may wish to attach magnets on the inside of the door which will hold it in place when closed.
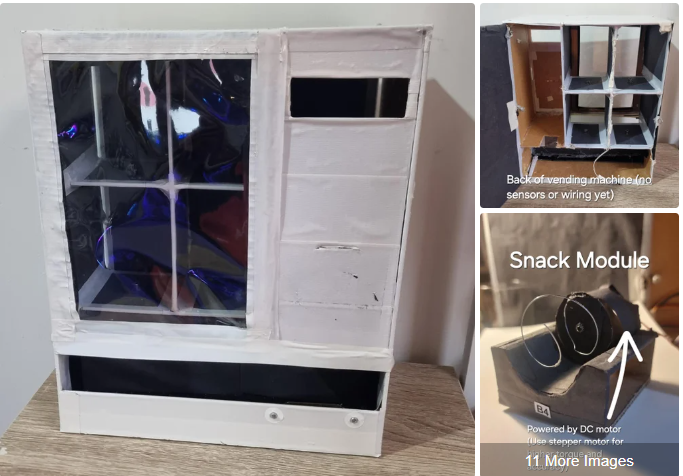
Snack dispenser assembly:
- Start by assembling the parts of the snack dispenser together and cover them with paper of your choice to make them look nice and finished.
- Then, carefully cut out a circle out of cardboard and cover with paper. The circle should be just small enough to fit in the snack dispenser assembly.
- Once done, create a small hole in the disk and using hot glue, glue it to the pinion gear of the dc motor, or servo.
- The using a water bottle, wrap the metal wire around it to form it into a spiral and cut it with the scissors or a pair of pliers.
- Use hot glue to attach the wire to the disk.
- Finally, hote glue the motor/servo to the snack dispensing box. Use some paper and glue to make the top curved and look nice. Your final product should look like the third picture in my slides.
- Repeat this process for however many snack dispensing units you need and then insert them into their locations.
Attaching electronics:
- Attach the LCD display to the front of the machine with hot glue.
- Carefully wire the membrane keyboard through the front hole, if you don’t have a hole, poke one with scissors. Then stick the keyboard onto the front.
- Then carefully poke a hole in the dispensing area and insert an RGB LED which will be used to indicate the status of your order.
- Attach the RFID module using double sided foam tape to the inside of the vending machine.
- Attach the led lights and wire them in each snack unit as shown in image 12.
- Finally wire all of your motors and LEDs down the centre of the back of the vending machine and tuck them away to hide them.
Although these steps might seem somewhat general, I hope they provide a clear overview. The primary objective in this step is to complete the construction of your vending machine and install all the essential electronic components.
Step 5: Attach Wires, Program, and Test
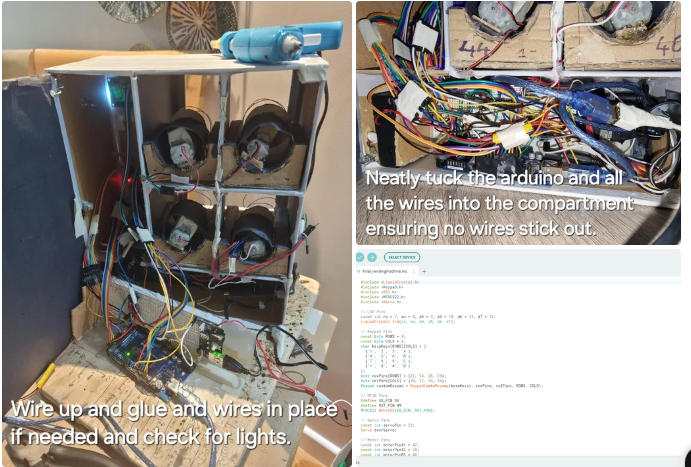
This step is straightforward for programmers but can be challenging for engineers! First, connect all the wires from your sensors and electronics to the Arduino board. Next, program your vending machine and test all the parts to ensure they function correctly. Since programming isn’t everyone’s strength, I’ve included my code for reference. I’m not a programmer myself, so please pardon any mistakes you might find. I highly recommend using AI tools to expedite the programming process and watching some tutorials on Arduino sensors. Lastly, place the Arduino and breadboard into the small compartment at the back of the vending machine, carefully bending the wires to fit. Ensure the door can close properly. Here is the code for my vending machine, which I hope you can adapt for your custom vending machine:
#include <LiquidCrystal.h>
#include <Keypad.h>
#include <SPI.h>
#include <MFRC522.h>
#include <Servo.h>

// LCD Pins
const int rs = 7, en = 8, d4 = 9, d5 = 10, d6 = 11, d7 = 12;
LiquidCrystal lcd(rs, en, d4, d5, d6, d7);

// Keypad Pins
const byte ROWS = 4;
const byte COLS = 4;
char hexaKeys[ROWS][COLS] = {
  {'1', '2', '3', 'A'},
  {'4', '5', '6', 'B'},
  {'7', '8', '9', 'C'},
  {'*', '0', '#', 'D'}
};
byte rowPins[ROWS] = {22, 24, 26, 28};
byte colPins[COLS] = {30, 32, 34, 36};
Keypad customKeypad = Keypad(makeKeymap(hexaKeys), rowPins, colPins, ROWS, COLS);

// RFID Pins
#define SS_PIN 53
#define RST_PIN 49
MFRC522 mfrc522(SS_PIN, RST_PIN);

// Servo Pins
const int servoPin = 23;
Servo doorServo;

// Motor Pins
const int motorPinA1 = 42;
const int motorPinA2 = 38;
const int motorPinB3 = 40;
const int motorPinB4 = 44;

// LED Pins
const int bluePin = 6;
const int greenPin = 5;

// Global Variables
String selectedCode = "";
float selectedPrice = 0.0;
bool isCardPresent = false;
bool isCardCorrect = false;
bool isMotorRunning = false;

// Constants
const int numItems = 4;
struct Item {
  String code;
  float price;
};
Item items[numItems] = {
  {"A1", 1.50},
  {"A2", 2.80},
  {"B3", 1.95},
  {"B4", 2.50}
};

// Servo Positions
const int lockedPosition = 20;
const int unlockedPosition = 180;

// Motor Run Time (in milliseconds)
const unsigned long motorRunTime = 5000; // 5 seconds

// Timing Constants
const unsigned long cardPresentTimeout = 20000; // 20 seconds
unsigned long cardPresentStartTime = 0;

void setup() {

  // Initialize LCD
  lcd.begin(16, 2);
  lcd.print("Please Select");
  lcd.setCursor(0, 1);
  lcd.print("Item: ");


  // Initialize Servo
  doorServo.attach(servoPin);
  doorServo.write(lockedPosition);

  // Initialize Motor Pins
  pinMode(motorPinA1, OUTPUT);
  pinMode(motorPinA2, OUTPUT);
  pinMode(motorPinB3, OUTPUT);
  pinMode(motorPinB4, OUTPUT);

  // Initialize LED Pins
  pinMode(bluePin, OUTPUT);
  pinMode(greenPin, OUTPUT);

  // Initialize RFID
  Serial.begin(9600);
  SPI.begin();
  mfrc522.PCD_Init();

  // Reset the machine
  resetMachine();
}

void loop() {
  // Handle keypad input
  char customKey = customKeypad.getKey();

  if (customKey) {
    if (customKey == '#') {
      selectedCode += customKey;
    } else if (customKey == '*') {
      resetMachine();
      lcd.clear();
      lcd.print("Cancelled");
      delay(2000);
      lcd.clear();
      lcd.print("Please Select");
      lcd.setCursor(0, 1);
      lcd.print("Item: ");
      return;
    } else {
      selectedCode += customKey;
      lcd.setCursor(7, 1);
      lcd.print(selectedCode);

      // Check if item selection is complete
      if (selectedCode.length() == 2) {
        selectedPrice = getItemPrice(selectedCode);
        if (selectedPrice != 0.0) {
          lcd.clear();
          lcd.print("Price: $");
          lcd.print(selectedPrice);
          lcd.setCursor(0, 1);
          lcd.print("Present Card...");
        } else {
          lcd.clear();
          lcd.print("Invalid Item");
          delay(2000);
          lcd.clear();
          lcd.print("Please Select");
          lcd.setCursor(0, 1);
          lcd.print("Item: ");
          selectedCode = "";
        }
      }
    }
  }

  // Check if a card is present
  if (selectedPrice != 0.0) {
    isCardPresent = checkCardPresent();
  }

  // If a card is present and it hasn't been verified yet, verify the card
  if (isCardPresent && !isCardCorrect) {
    isCardCorrect = verifyCard();
  }

  // If the card is verified and the item is selected, process the transaction
  if (isCardCorrect && selectedPrice != 0.0) {
    processTransaction();
  }
  // Check if the card present timeout has exceeded
  if (isCardPresent && !isCardCorrect && cardPresentStartTime > 0 && millis() - cardPresentStartTime > cardPresentTimeout) {
    lcd.clear();
    lcd.print("Transaction");
    lcd.setCursor(0, 1);
    lcd.print("Failed");
    digitalWrite(bluePin, LOW); // Turn off blue LED
    delay(2000); // Wait for 2 seconds
    resetMachine();
    lcd.clear();
    lcd.print("Please Select");
    lcd.setCursor(0, 1);
    lcd.print("Item: ");
  }
}


bool checkCardPresent() {
  // Check for a new card
  if (!mfrc522.PICC_IsNewCardPresent() || !mfrc522.PICC_ReadCardSerial()) {
    return false;
  }
  // Wait for a card to be removed if it was detected previously
  if (isCardPresent) {
    unsigned long cardRemovedTime = millis();
    while (mfrc522.PICC_IsNewCardPresent()) {
      if (millis() - cardRemovedTime > cardPresentTimeout) {
        lcd.clear();
        lcd.print("Transaction");
        lcd.setCursor(0, 1);
        lcd.print("Failed");
        delay(2000); // Wait for 2 seconds
        resetMachine();
        lcd.clear();
        lcd.print("Please Select");
        lcd.setCursor(0, 1);
        lcd.print("Item: ");
        return false;
      }
    }
  }


  cardPresentStartTime = millis();  // Record the start time when a card is detected


  // Check if card UID matches the correct UID
  byte correctUid[4] = {0x22, 0xAF, 0x47, 0x39}; // Correct UID tag: 22 AF 47 39
  for (byte i = 0; i < mfrc522.uid.size; i++) {
    if (mfrc522.uid.uidByte[i] != correctUid[i]) {
      lcd.clear();
      lcd.print("Unauthorized");
      lcd.setCursor(0, 1);
      lcd.print("Card");
      delay(2000); // Wait for 2 seconds
      resetMachine();
      lcd.clear();
      lcd.print("Please Select");
      lcd.setCursor(0, 1);
      lcd.print("Item: ");
      return false;
    }
  }


  return true;
}


bool verifyCard() {
  // Verify card by entering a PIN
  lcd.clear();
  lcd.print("Enter PIN:");
  String enteredPin = "";
  int pinLength = 4;
while (enteredPin.length() < pinLength) {
  char key = customKeypad.getKey();
  if (key) {
    if (key == '#') {
      if (enteredPin.length() > 0) {
        enteredPin = enteredPin.substring(0, enteredPin.length() - 1);
        lcd.setCursor(enteredPin.length(), 1);
        lcd.print(" ");
      }
    } else if (key == '*') {
      return false;
    } else {
      enteredPin += key;
      lcd.setCursor(enteredPin.length() - 1, 1);
      lcd.print('*');
    }
  }
}


  // Check if entered PIN is correct
  String correctPin = "9447"; // Correct PIN: 1234
  if (enteredPin == correctPin) {
    lcd.clear();
    lcd.print("Card Verified");
    delay(2000); // Wait for 2 seconds
    lcd.clear();
    lcd.print("Price: $");
    lcd.print(selectedPrice);
    lcd.setCursor(0, 1);
    lcd.print("Confirm (#)");
    while (true) {
     char key = customKeypad.getKey();
     if (key == '*') {
       resetMachine();
       break;
      } else if (key == '#') {
        break;
      }
  // Do nothing if no key is pressed, continue waiting
    }
    return true;
  } else {
    lcd.clear();
    lcd.print("Invalid PIN");
    digitalWrite(bluePin, LOW);
    delay(250);
    digitalWrite(bluePin, HIGH);
    delay(250);
    digitalWrite(bluePin, LOW);
    delay(250);
    digitalWrite(bluePin, HIGH);
    delay(250);
    digitalWrite(bluePin, LOW);
    delay(250);
    resetMachine();
    lcd.clear();
    lcd.print("Please Select");
    lcd.setCursor(0, 1);
    lcd.print("Item: ");
    return false;
  }
}

float getItemPrice(String code) {
  for (int i = 0; i < numItems; i++) {
    if (items[i].code == code) {
      return items[i].price;
    }
  }
  return 0.0;
}

void processTransaction() {
  lcd.clear();
  lcd.print("Processing");
  lcd.setCursor(0, 1);
  lcd.print("Payment...");
  delay(500);
  lcd.clear();
  lcd.print("Processing");
  lcd.setCursor(0, 1);
  lcd.print("Payment..");
  delay(500);
  lcd.clear();
  lcd.print("Processing");
  lcd.setCursor(0, 1);
  lcd.print("Payment...");
  delay(500);
  lcd.clear();
  lcd.print("Processing");
  lcd.setCursor(0, 1);
  lcd.print("Payment..");
  delay(500);
  lcd.clear();
  lcd.print("Processing");
  lcd.setCursor(0, 1);
  lcd.print("Payment...");
  // Check if the transaction was successful
  if (isCardCorrect) {
    lcd.clear();
    lcd.print("Transaction");
    lcd.setCursor(0, 1);
    lcd.print("Completed!");

    if (selectedCode == "A1") {
      spinMotor(42, 1);
    }
    else if (selectedCode == "A2") {
      spinMotor(38, 2);
    }
    else if (selectedCode == "B3") {
      spinMotor(40, 1);
    }
    else if (selectedCode == "B4") {
      spinMotor(44, 1);
    }
    digitalWrite(bluePin, LOW);
    digitalWrite(greenPin, HIGH);
    unlockDoor();
    lcd.clear();
    lcd.print("Enjoy!");
    delay(8000); // Wait for 8 seconds
    resetMachine();
    digitalWrite(bluePin, HIGH);
    lcd.clear();
    lcd.print("Please Select");
    lcd.setCursor(0, 1);
    lcd.print("Item: ");
  } else {
    // Card verification failed
    lcd.clear();
    lcd.print("Transaction");
    lcd.setCursor(0, 1);
    lcd.print("Failed");
    delay(2000); // Wait for 2 seconds
    resetMachine();
    lcd.clear();
    lcd.print("Please Select");
    lcd.setCursor(0, 1);
    lcd.print("Item: ");
  }
}


void resetMachine() {
  selectedCode = "";
  selectedPrice = 0.0;
  isCardPresent = false;
  isCardCorrect = false;
  isMotorRunning = false;
  cardPresentStartTime = 0;
  digitalWrite(bluePin, HIGH); // Turn off blue LED
  digitalWrite(greenPin, LOW); // Turn off green LED
  doorServo.write(lockedPosition);
  stopMotor();
}


void spinMotor(int motorPin, unsigned long duration) {
  digitalWrite(motorPin, HIGH);
  isMotorRunning = true;
  delay(duration * 1000);
  digitalWrite(motorPin, LOW);
  isMotorRunning = false;
}


void stopMotor() {
  if (isMotorRunning) {
    digitalWrite(motorPinA1, LOW);
    digitalWrite(motorPinA2, LOW);
    digitalWrite(motorPinB3, LOW);
    digitalWrite(motorPinB4, LOW);
    isMotorRunning = false;
  }
}


void unlockDoor() {
  doorServo.write(unlockedPosition);
  digitalWrite(greenPin, HIGH); // Turn on green LED
}
Step 6: Optional Final Modifications
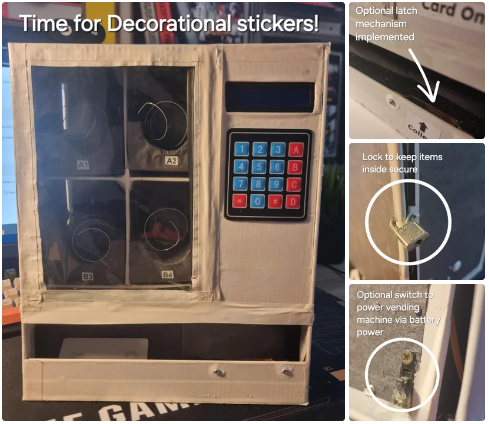
This step can be skipped, but I actually recommend this step a lot since it allows your creativity to flow endlessly and can make your vending machine look and work 10 times better! I have listed some ideas below that worked for me and some which you could add yourself.
- Print out some images and text and stick them with a glue stick to give more life to your vending machine. It will certainly make it look more realistic.
- Implement a latch mechanism and a door at the bottom which could.potentially unlock only once the user has paid.
- Add a lock to keep your snacks secure from people trying to steal your snacks!
- Add a switch to allow your vending machine to be battery operated or simply a switch which will turn it on and off.
- Additionally, you could add a pin in your program so the user has to enter a pin upon buying a snack. This will stop any unauthorised people from taking your snacks away from you.
Step 7: Enjoy Your Vending Machine!
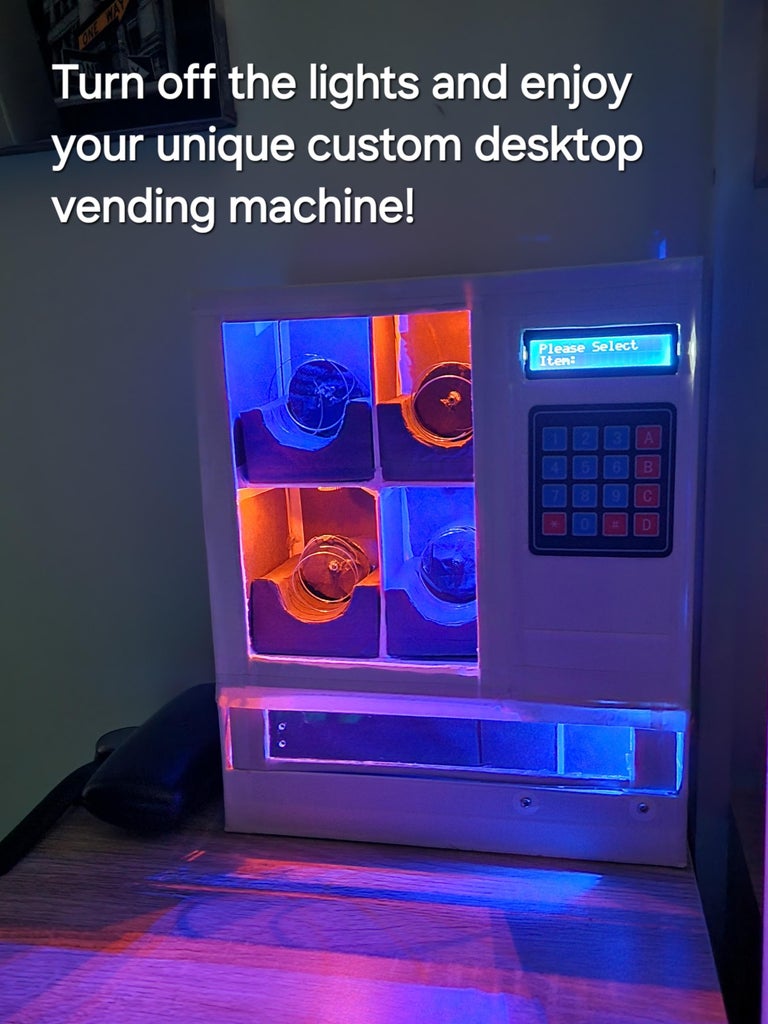


Congratulations! You are now the proud owner of a desktop vending machine! This charming addition to your room or office is sure to draw plenty of attention and add a bit of fun to your day. Turn off the lights and enjoy the stunning LED display as your vending machine lights up the room! You can now stock it with anything you like—chocolates, sweets, teabags, hot chocolate packets—the possibilities are endless! If you decide to embark on this project, I would love to hear about the goodies you chose to fill your mini vending machine with!