
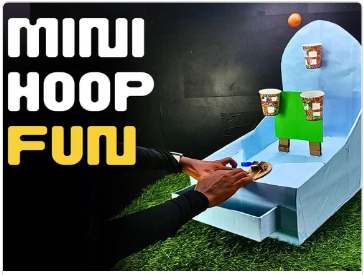
Games have always been a cornerstone of entertainment, bringing joy and excitement to people of all ages. While there are countless commercially available games, creating your own can be a uniquely rewarding experience. This DIY project uses simple materials—cardboard and plastic glasses—to craft a fun and engaging game. Not only does it provide an excellent opportunity to repurpose everyday items, but it also sparks creativity and problem-solving skills. Let’s get started on this captivating journey!
Supplies
- Cardboard sheets
- Plastic glass
- Scissors or craft knife
- Ruler
- Colourful Art Paper
- Pencil
- Glue gun or strong adhesive
- Markers or paint for decoration
- Small thermocol balls
Step 1: Plan Your Layout


- Decide the dimensions of your game board. This will depend on the size of your cardboard sheet and the space available for gameplay.
- Use a ruler to measure and mark these dimensions on your cardboard sheet. Ensure that the board is large enough to comfortably accommodate the plastic glasses and any other game elements.
Step 2: Placing the Cardboard Structures


- Cut Cardboard Supports: Based on your design, cut smaller pieces of cardboard to act as supports or barriers on your game board. These structures will help keep the plastic glasses in place.
- Shape the Supports: Depending on your design, you might need rectangular strips, circular bases, or other shapes. Make sure these pieces are sturdy enough to hold the glasses securely.
Step 3: Covering the Playing Area


- If you want a neat finish, cut pieces of chart paper to cover the cardboard structures. Apply glue to the surface of the game board. Make sure to cover the entire surface evenly.
- Carefully place the chart paper onto the glued surface, starting from one end and smoothing it out as you go to avoid bubbles and wrinkles.
- Fold the excess chart paper over the edges of the board and glue them down.
Step 4: Cutting the Glasses


- Make a hollow surface beneath the glass for the ball to pass through it.
- Use fine-grit sandpaper to smooth out any rough edges.
Step 5: Adding Structures


6 More Images
- To enhance your DIY game, consider adding more structures like barriers, ramps, or platforms. These elements not only add complexity and strategy but also create an engaging playing experience.
Step 6: Mechanism Making


8 More Images
- To incorporate mechanisms into your DIY game, start by sketching designs for levers, spinners, pulleys, or sliders. For levers, cut cardboard rectangles, create a pivot with a brass fastener, and test for smooth movement..
- For pulleys, cut cardboard circles, thread a string through them, and secure to the board, connecting the string to movable game components. For sliders, create tracks from cardboard strips and ensure the sliders fit and move easily. Secure all mechanisms, test thoroughly for functionality, and decorate as needed to enhance both the gameplay and visual appeal.
Step 7: Designing the Playing Area


5 More Images
- Place each and every object it’s designated place.
- After placing, inspect the entire playing area to ensure all pieces are securely attached and the decorations are well-applied. Reinforce any loose edges or areas with additional glue as needed.
- Set up your game and conduct a test run to ensure the playing area functions as intended.
Step 8: Final


By following these steps, you’ll create a professionally finished playing area for your DIY game, combining creativity with practicality. Take your time with each stage to ensure a quality result that’s ready for hours of enjoyment with family and friends. Enjoy your completed project and the satisfaction of bringing your game idea to life!


