


What Is MiniMosaic Keychain?
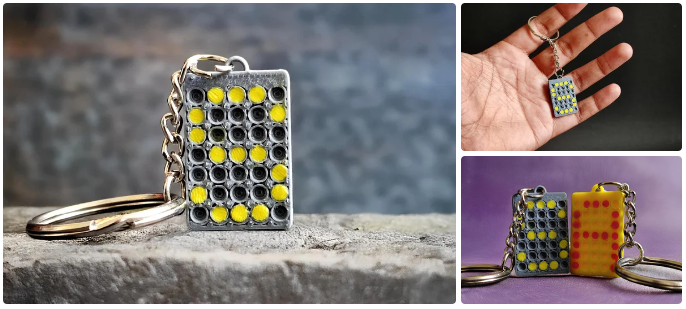
The MiniMosaic Keychain is a customizable and creative accessory that combines the versatility of 3D printing with the vibrant artistry of clay modeling. The keychain features a 5×7 grid of small round holes designed to be filled with colorful polymer clay. This allows you to create your own unique designs, such as letters, symbols, or intricate patterns, giving you the freedom to personalize your keychain according to your preferences.
The Inspiration
The idea for the MiniMosaic Keychain came from the difficulty in finding attractive and specific single-letter keychains. Many available options were either unattractive or didn’t offer the desired letter. The MiniMosaic Keychain solves this problem by providing a fully customizable solution where you can create any letter or design you want, making it both functional and aesthetically pleasing.
With the MiniMosaic Keychain, you not only get a practical item for holding your keys but also a miniature canvas for your creativity. The combination of modern technology and traditional crafting techniques makes it a unique and enjoyable project.
Supplies

- 3D printer
- ABS filament
- Colorful polymer clay
- Keychain ring
- Small tools (to shape and press clay)
- Sandpaper (optional)
Step 1: Design the Keychain


1.Design the Keychain:
- Launch Tinkercad and start a new project.
- Begin by placing a box shape onto the workplane, which will serve as the base of your keychain.
- Adjust the dimensions of the box to 20×30 mm to comfortably accommodate a 5×7 grid of round holes.
- From the shapes panel, select a ball shape and resize it to create a round hole. Duplicate this cylinder to create multiple holes arranged in a 5×7 grid pattern on the top surface of the box.
- Use Tinkercad’s alignment tools to evenly space and align the holes in the desired formation.
- Add a hole at the top center of the box for attaching the keychain ring. Ensure this hole is large enough to accommodate your keychain ring.
2.Review and Finalize:
- Double-check the design to ensure all elements are correctly positioned and aligned.
- Adjust as necessary to achieve the desired layout for your MiniMosaic Keychain.
3.Export the STL File:
- Once satisfied with the design, export it as an STL file. This file format is compatible with most 3D printers and slicing software.
https://www.tinkercad.com/embed/eQUC0ZsPNIO
Step 2: 3D Print the Keychain


1.Set Up the Printer:
- Ensure your 3D printer is set up with ABS filament and the print bed is properly leveled.
2.Printer Settings:
- Adjust the slicing software settings for ABS filament with the following specifications:
- Layer Height: 0.1 mm (High Quality)
- Infill Density: 30%
- Consider using a heated bed and an enclosure to prevent warping, which ABS filament is prone to.
3.Print the Keychain:
- Start the print and monitor the progress. Ensure that the printer is set to produce a sturdy base that accommodates the 5×7 grid of holes accurately.
4.Post-Processing:
- Once the print is complete, carefully remove the keychain from the print bed. Use sandpaper if necessary to smooth any rough edges.
Step 3: Prepare the Clay


1.Choose Your Colors:
- Select the colors of polymer clay you want to use for your MiniMosaic Keychain design. Consider colors that will contrast well and highlight your intended patterns or letters.
2.Condition the Clay:
- Knead each color of clay separately until it’s soft and pliable. This process helps to warm and soften the clay, making it easier to work with and mold into the small holes of the keychain.
- Ensure that the clay is thoroughly conditioned to avoid any air bubbles or inconsistencies in texture.
3.Prepare Small Balls of Clay:
- Roll small balls of clay that are slightly larger than the diameter of the holes on your keychain base. These balls will be pressed into the holes to create your designs.
- You may want to create multiple balls of each color, depending on the complexity and number of designs you plan to create on your keychain.
4.Organize Your Workspace:
- Set up a clean and organized workspace with enough room to lay out your clay balls and tools.
- Use a smooth, clean surface to prevent any dirt or debris from affecting your clay as you work.
5.Tools for Shaping:
- Prepare small tools such as toothpicks, clay shaping tools, or even the end of a small paintbrush to help press the clay into the holes and shape it as desired.
- These tools will assist in creating intricate details and ensuring the clay fits snugly within each hole.
Step 4: Create Your Design


1.Shape the Clay:
- Take one of the prepared balls of polymer clay and gently press it into one of the round holes on your keychain base. The clay ball should be slightly larger than the diameter of the hole to ensure a snug fit.
- Use your fingers or small tools to press the clay firmly into the hole, ensuring it fills the space completely without any gaps.
2.Fill All Holes:
- Continue filling each of the 5×7 grid of round holes with clay balls. Experiment with different colors and arrangements to create your desired patterns, letters, or symbols.
- Take your time to arrange the clay balls neatly and evenly across the keychain base.
3.Shape and Smooth the Clay:
- After placing each clay ball, use your tools to shape and smooth the clay surface as needed. This will help refine the edges and details of your design.
- Ensure that each clay ball is firmly pressed and securely positioned within its respective hole.
4.Create Intricate Designs:
- Utilize the flexibility of polymer clay to create intricate designs and details on your keychain. You can mix colors, create gradients, or add texture to enhance your design.
- Take breaks to step back and assess your design, making adjustments as necessary to achieve your desired look.
5.Final Touches:
- Once satisfied with your design, ensure that all clay balls are securely in place and the surface is smooth.
- Double-check the overall appearance and symmetry of your design before proceeding to any final adjustments.
Step 5: Final Touches


1.Attach the Keychain Ring:
- Once the clay is fully cooled and hardened (if baked), insert a keychain ring through the hole at the top center of the keychain base.
- Ensure the keychain ring is securely attached to the keychain, allowing you to easily attach keys or use it as a decorative accessory.
2.Inspect and Finalize:
- Carefully inspect the entire keychain to ensure all clay balls are securely in place and the keychain is free from any imperfections.
- Use a small tool or sandpaper to gently smooth any rough edges or uneven surfaces if needed.
3.Personalize and Decorate:
- Optionally, you can further personalize your MiniMosaic Keychain by adding additional details or decorations using paints, varnishes, or embellishments.
- Allow any additional decorations to dry completely before using or gifting your keychain.
Step 6: Enjoy Your MiniMosaic Keychain!


- Show Off Your Creation: Attach your keys or use the keychain as a decorative accessory. You now have a unique, customizable keychain that you can change and redesign whenever you want.
Tips:
- Experiment with different color combinations and designs to make each keychain unique.
- If you make a mistake with the clay, simply remove it and try again.
- You can also create multiple keychains with different designs for various occasions or as personalized gifts.