
Put your ideas and passion first in this project. If you’re not genuinely interested in robotics, it’s best to pursue something you truly enjoy. I must emphasize that this project is NOT as easy as it might appear. However, if you are passionate about it, you will find it much more manageable.
Proper design is crucial; without it, your bots may behave unpredictably, blades could fail on impact, or various components might not fit together correctly. If you have any questions, feel free to ask in the comments. I’ll be available to answer your queries for a limited time after I publish this “instructable.”
I’ve always been fascinated by shows like BattleBots and Robot Wars since I was a child. Watching participants build and battle robot vehicles sparked my interest in mechanics and ultimately influenced me to pursue a career in engineering. Although I’ve never had the chance to compete in a BattleBot championship, a fun cardboard-making challenge recently came up, and I decided to create a battlebot using cardboard boxes.
Cardboard is an ideal material for this project because it is flexible, easy to obtain and cut, and it can absorb hits without cracking. This makes it perfect for constructing battlebots. Moreover, children can learn a lot from building these bots, gaining hands-on experience with mechanics and engineering concepts.
This is my effort to create a novel cardboard indoor battlebot. Even if you’re an adult, having a battlebot arena in your game room would be a fantastic addition alongside your pool table or arcade machine.
This actually turned out to be pretty cool. Using the concepts, a teacher can also raise interest in young children in S.T.E.M field: namely, Science, technology, Engineering, Maths field. A children can learn about basic robotics, forces and inertia, Arduino programming, making a very basic artificially intelligent computer opponent and so on. Teachers can organise competitions and make this a hands-on learning project curriculum also. And of course not to forget the fun part. Which kid does not like a toy that moves and fights?!
Supplies

There are maaaany bots and sub-variations to choose from. But i chose what resembles a “Tombstone” and “Biteforce” due to their simplicity in design. Check my basic project sketch out. Forgive the bad handwriting as always.
The supplies will not be limited to what I have provided. For example, if I have used a certain kind of motor and wheel you can use a different one with similar function. So I’ll be listing the basic parts and you can choose as you like or as per availability around you.
So instead of keeping your mind fixed on the provided supplies, keep an open mind and use your creativity to find similar parts that you would like. That will make this project interesting for you. Read along to get the idea about what is required for this project.
We will be making:
Robot 1 (The Hookmaster) It hits opponent from a side hook by a horizontal spinner. Shifts opponent sidewise. Easy to make, It will be our CPU opponent. Which will try to knock us sideways.
Robot 2 (The Uppercut Expert) it hits opponent like an uppercut by a vertical spinner. It will try to lift the opponent and either topple it/push it or break some vital parts.
Let us go into more detail:
To make the cardboard chasis:
- Printed Cut-outs: Take prints of the provided cut-outs in A4 or A3 sizes. (see next step)
- Paper cutter knife. https://www.amazon.com/dp/B0BYHXL3TK
- Toothpicks to attach the paper onto cardboard (4nos.) https://www.amazon.com/dp/B00KJN84TW
The wheels:
- 4 nos Geared motor and wheel Sets (Any 100-200 RPM , 5-12volts common DC motor will do) https://www.amazon.com/dp/B099Z85573
- Sewing needle and threads to bind the wheel into the cardboard before gluing. https://www.amazon.com/dp/B09PDLFS23?th=1
The Blades:
- Copper wire to bind the ballast. https://www.amazon.com/dp/B07DYG6DVP
- some heavy iron plates as inertial ballast. (I salvaged some old low voltage transformer cores https://www.amazon.com/dp/B08T9DJ1LH)
- Transparent tape. https://www.amazon.com/dp/B0BR3Z5Z2V
- Some accessories of dc motor: https://www.amazon.com/dp/B0776ZPP7V
- gears which fit a motor shaft tightly to hold the blades.
- 4 nos. steel rod: 2mm thick, 50mm long and a gear to fix the wheel(or 4 nos 30mm long, M2 screw)
Uppercut robo motor connection:
- Old Discarded USB wire for the remote control. ( It has 4 wires inside it. which will be equal to 3 channels and one ground. That means two wheels and a blade motor.) https://www.amazon.com/dp/B0CKTSQPG9
- Soldering iron and other soldering items like soldering wire https://www.amazon.com/dp/B087767KNW.
- Enamled Copper Wires for connection
Wheels:
- A Nail to heat and make holes for screw.
- Plier to hold the nail.
- Lighter/ candle to heat the nail.
- 2 nos. Front wheel: 3d print the file I have provided or search for omnidirectional wheel like this. https://www.amazon.com/dp/B0CQXLQ2QT
Spinner:
- Two D.C motors for the spinning mechanisms.
- steel plate from old transformer as a stiffening mechanism plate for the impactor.
Remote:
- A breadboard of approx 4″x2″ size
- Three push button switches. https://www.amazon.com/dp/B01CGMP9GY
- Rechargeable 9 volt batteries . You can have one 9v lipo battery or make the battery from two 4.5 volt lipo pencil batteries. https://www.amazon.com/dp/B0B74LR9R7
- Lipo charger. https://www.amazon.com/dp/B06XR87987
CPU bot:
- Arduino Uno or similar microcontroller with uploading wire https://www.amazon.com/dp/0BV9XFQ5T
- Adafruit motor shield V1 or any motor driver to drive 3 motors https://www.amazon.com/dp/B01DG61YRM
- HC Sr04 ultrasonic range finder https://www.amazon.com/dp/B01GNEHJNC
- A switch to turn off or on.
- PC with arduino ide installed to upload code.
Step 1: Download Cutouts
I suggest to use the cardboard cut outs as I have provided. It will make the making part a lot easier for you. I have provided the .svg files also so you can laser cut them if you have the machine. Or you can take the .pdf printouts in A4 or A3 sizes and put them on cardboards then cut by a paper cutter.(I have no experience in laser cutting of cardboards, so use the .Svg after checking them first. you may need to do some cleaning of the letters etc.)
Attachments
- robo1_A4.pdfDownload
- robo1-A3.pdfDownload
- robo2-A3.pdfDownload
- robo2a4.pdfDownload
- robo1.svgDownload
- ROBO2.svgDownload
Step 2: Cut on Paper


After taking the print out, put them on a cardboard then use some toothpick to stick them over it. Then cut with a paper cutter as shown.
Step 3: Fold


Fold the cardboards along the dotted lines. You can take help of a ruler to make the seam straight.
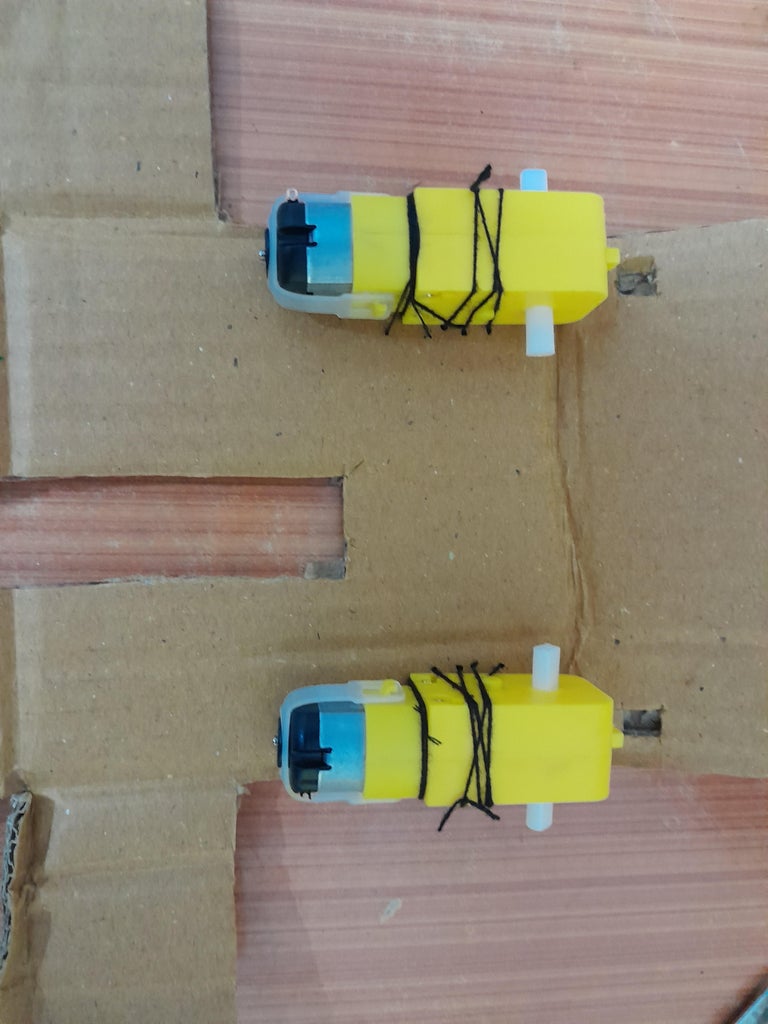
Step 4: Fix Motors


The motor I had, did not have a lot of gap from the wheel. So I had to cut the cardboard present between the wheel and the motor. If you have sufficient gaps, you don’t need to do this.
Make the cuts as shown before you fold the box.
Step 5: Fix the Blades


I have salvaged an old toy to get the motor and some parts. but you can use freshly ordered parts as well.
The blade can be made in many innovative ways. You can make it out of plastic, sharp metal, Razor blades (Be careful because it may break and deflect. So don’t do it unless you have an arena made out of Polycarbonate covering like the real “Battleblots”). Or as a safe bet, use cardboard with iron ballast load as shown.
You need some “heavy-ness” in the blades so it stores energy and gives maximum force at impact. The cardboard is realle good because it does not crack under impact.
Bind the ballast and a circular plate which can fit a motor tightly with copper wire as shown.
Step 6: “make Uppercut”: the Motor


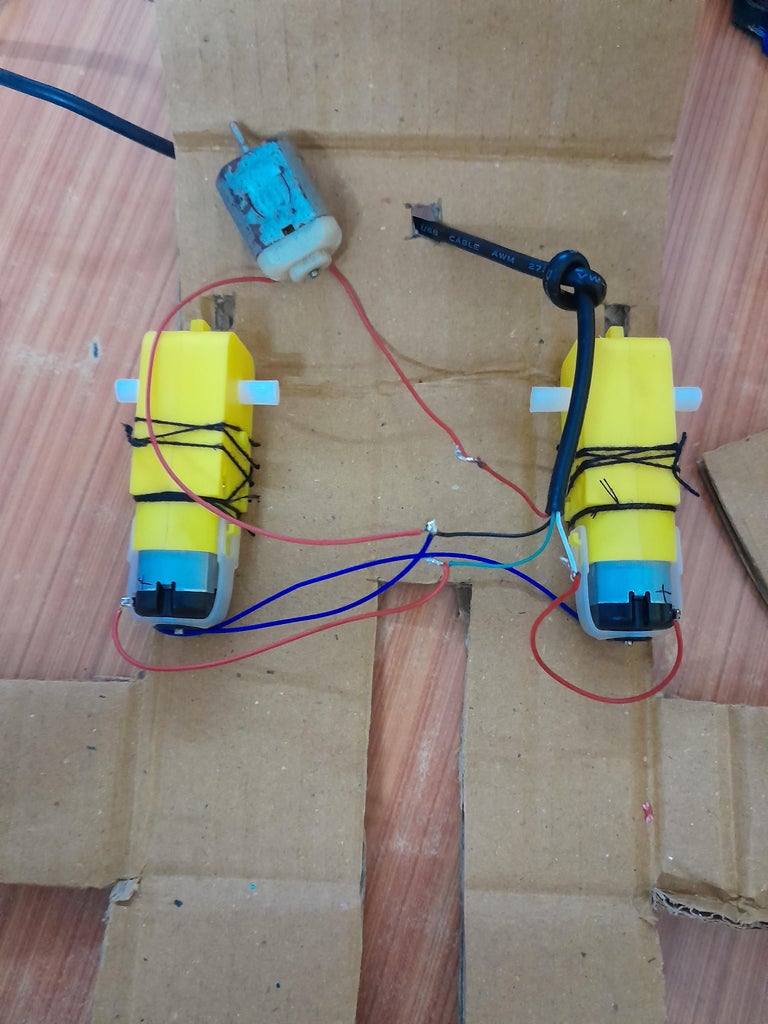
Fix the motors on the cardboard as shown. Then connect 5 volt current to the motor poles. Check which one is the positive pole of the motor when the wheels turn forward. See attached video. Then mark the poll as positive.
Take a discarded USB wire. It will have 4 small wires in it. Connect the black one to the negative of all the motors. and the coloured one to the positive sides.
Solder them with soldering iron
Cover them with transparent tape.
Attachments
Step 7: Cardboard Chasis


Use white super glue to attach the inner cardboard walls to the main chasis. White super glue will bond the papers really well. After that, use transparent tape as a second layer of reinforcement around the cardboards.
Step 8: Fix Wheels


The wheels may look simple but fixing them can be very interesting. Because wheels fixed by novice people can come out easily. They may also slip around the axis. So they need to be tightly fixed.
Hold a nail with a Plier and heat it over a lighter or a candle. The use that to hole through the wheel as shown. Now you can put a long screw to fix the wheel to the axle or use a thin rod and gear as shown to fix.
Now the wheel will not slip because of the grooves in the axle and also not come out because of the tight gear.
Step 9: Spinner


Fix the spinner motor as shown with copper wire. You also need some stiffener. So that the motor can take the force generated during impact. Else the cardboard will deform and tear upon impact. The stiffener you see is made of iron plate salvage from old transformer part. You can use any steel plate or plastic plate as you wish.
Step 10: Front Wheel


You need a wheel for the front part for each of the robots. It can be ordered online from any mechatronix store or you can 3D print the files I provided.
Attachments
Step 11: The Hookmaster


This chasis is simple to make. Just fold along the seams and tie the motor with threads and reinforce with super glue + tape
Step 12: The Remote for UppercutExpert


I have made a very simple remote for this. It does not have any requirement for radio modules or programming. It is simply made by connecting wires to batteries through connection switches.
Check the simple connection sketch made.
The right button turns the left wheel, so the robot goes to the right and similarly the other button if for going left. when you press both of the buttons using your thumb, the both the wheels turn and the robot goes forward.
There is no back movement because that will increase the channel requirements of the remote and you will need special wires and the design will go from simple to complex.
For now just pull the vehicle backwards to move it backwards.
You can charge the batteries as shown.
Step 13: Test UppercutExpert
Test how the robot moves and acts, as shown in the video. It worked pretty well.
Attachments
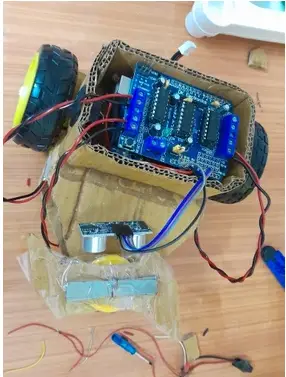
Step 14: CPU Controlled Mechanism


Add a cardboard box on top of the robot. Then glue it. It will hold the battery and the circuit. After placing the battery, connect it with a switch and then connect the arduino and adafruit motor shield v1 and the ultrasonic range Finder.
Dont turn on the switch yet. Keep it turned off .
Step 15: Programming

First we will do the programming.
We will use very simple sketches in Arduino IDE to check the parts. We will upload via usb cable from pc to arduino board. I am not going into very detail like how to install arduino ide software or upload code etc. because they are standard tutorials you can google online. But If you need any help or direction, ask me in the comments.
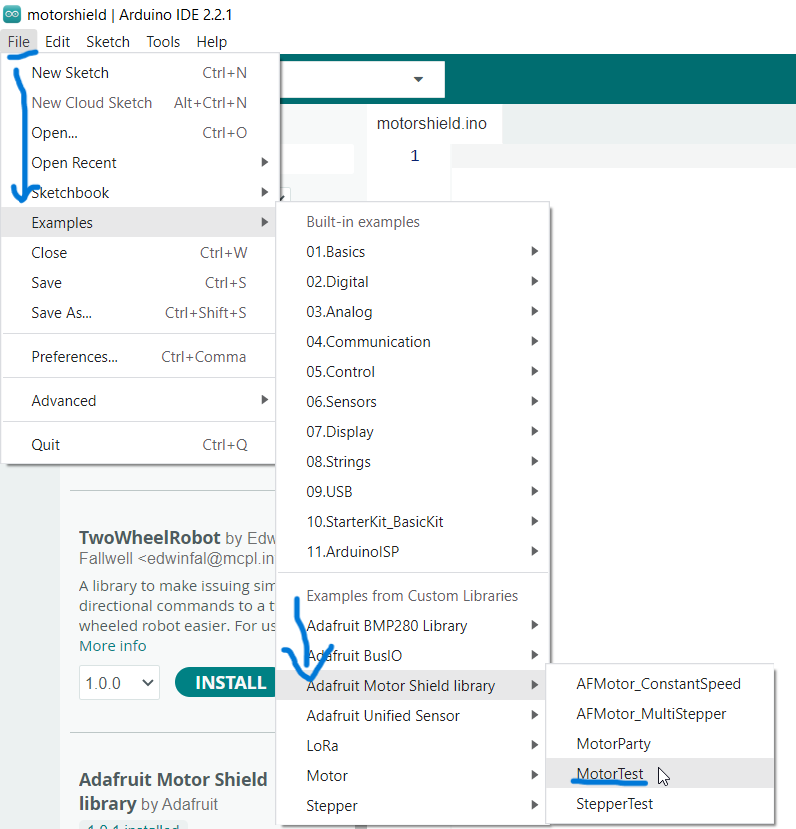
MOTOR CODE:
In the Arduino IDE software, search for the library as shown in the first pic. Install it.
Then open a sketch as shown in the next pic.
Modify the number “4” shown inside the sketch as 1,2 or 3. Each number represents each motor connected to the shield.1 is the right wheel, 2 is the spinner and 3 is the left wheel. so you need to check the motors individually by modifying the code. Then upload the file to Arduino board. The motor will start to rotate. in this way check the motors of right wheel, left wheel, and the spinner. If any of the motor turns in the opposite direction during startup, then interchange the wires which are connected to the motor shield. This will reverse the polarity and make the turn right. This is so that you can keep the code provided in the next step and reduce extra work.
ULTRASONIC DISTANCE FINDER (hcsr04) CODE:
To check the distance sensor, use the attached code. The distance from the sensor should appear in the serial monitor of arduino.
Attachments
Step 16: Code Design

The code is designed in these steps:
First, the robot keeps turning when nothing is present near it. Only when something is within a given distance it goes towards it. When it loses its target, it starts spinning in a randomised direction. So that people cannot predict it easily. See the attached video of its behaviour. You can make your own code but. This simple code worked well for me.
Upload the attached program which contains code sections to incorporate the above steps. Now remember to remove the jumper marked in the red. Only after this, you can turn on the battery. Or you may burn the arduino voltage breaker (like me). And will not be able to upload directly.
When you have uploaded successfully, then put the robot near a small object to test its function as shown below.
Attachments
- Arduino Code
#include

// Motor definitions
AF_DCMotor motorRight(1); // Motor on port 1 for right wheel
AF_DCMotor motorLeft(3);  // Motor on port 3 for left wheel
AF_DCMotor motorExtra(2); // Motor on port 2

// Ultrasonic sensor pins
const int trigPin = A1; // Interchanged pin
const int echoPin = A0; // Interchanged pin

// Variables for distance measurement
long duration;
int distance;
bool rotating = false;
bool rotateLeft = false;

void setup() {
  // Initialize motors
  Serial.begin(115200);           // Set up Serial library at 9600 bps
  Serial.println("Motor test!");

  motorRight.setSpeed(100);
  motorLeft.setSpeed(100);
  motorExtra.setSpeed(200);

  motorRight.run(RELEASE);
  motorLeft.run(RELEASE);
  motorExtra.run(RELEASE);

  // Initialize ultrasonic sensor pins
  pinMode(trigPin, OUTPUT); // Sets the trigPin as an Output
  pinMode(echoPin, INPUT);  // Sets the echoPin as an Input

  // Initialize random seed
  randomSeed(analogRead(0));
}

void loop() {
  // Measure distance using ultrasonic sensor
  digitalWrite(trigPin, LOW);
  delayMicroseconds(2);
  digitalWrite(trigPin, HIGH);
  delayMicroseconds(10);
  digitalWrite(trigPin, LOW);

  duration = pulseIn(echoPin, HIGH);
  distance = duration * 0.034 / 2;

  Serial.print("Distance: ");
  Serial.println(distance);

  if (distance > 30) {
    if (!rotating) {
      // Randomize rotation direction
      rotateLeft = random(2) == 0;
      rotating = true;
    }

    if (rotateLeft) {
      motorRight.run(FORWARD);
      motorLeft.run(BACKWARD);
    } else {
      motorRight.run(BACKWARD);
      motorLeft.run(FORWARD);
    }

    motorExtra.run(RELEASE); // Ensure motorExtra is stopped
  } else {
    rotating = false;

    if (distance < 25) {
      // Move forward and run motorExtra
      motorRight.run(FORWARD);
      motorLeft.run(FORWARD);
      motorExtra.run(FORWARD); // Run motorExtra when distance < 60 cm
    } else {
      // Move forward
      motorRight.run(FORWARD);
      motorLeft.run(FORWARD);
      motorExtra.run(RELEASE); // Ensure motorExtra is stopped
    }
  }

  // Small delay to allow ultrasonic sensor to update
  delay(100);
}
- 01.mp4Download
Step 17: Lets Play!
Round 1: Player times his entry but alas! the spinning hook master pushes him off the arena. 1 for CPU.
Round 2: A long lasting sumo fight between two players. The CPU handles really well in a small area and targets sufficiently well. But the player manages to push Cpu away the edge and Cpu falls down. 1-1 its draw.
Round 3: Player upgrades its weight to 300 gm to match Cpu weight. Also it upgrades its blade with more ballast for more power. A nice uppercut flips CPU and it falls outside the ring. Its a WIN for the player.
You can play 1v1, vs CPU. Why not program your own bot and do a CPU vs CPU among friends to see who is the better programmer? Best of luck!
Hope you have enjoyed the match as much as I did. You have to press the favourite button ok.
![]()


