
I’ve lost track of how many versions of the Midbar data vault I’ve released. Although they have been functional, setting them up has been far from straightforward, particularly for those without a software engineering background. The process of getting Midbar operational involves several technical steps: installing UART bridge drivers, setting up the development environment, installing necessary libraries, modifying firmware, and hoping for a successful compilation—all before even using the device. And that’s not even considering the assembly part.
To simplify this process, I’ve developed a version that only requires you to install the UART bridge drivers, open the WebFlash page, make a couple of clicks, and you’ll have an IoT data vault ready to configure without leaving the page.
If you’re interested in building an advanced IoT data vault that uses AES-256 encryption for your data, continue reading this tutorial.
You can also find this tutorial on Medium, Hackster, and Maker Pro.
Supplies
- ESP32-2432S028R x1
- PS/2 Keyboard x1
- PS/2 Port x1 *optional
Step 1: Install UART Bridge (COM Port) Drivers
To flash the ESP32-2432S028R (CYD), you have to install the UART driver for the CH340G. I’ve also included a link for the CP210x driver, just in case you decide to use the ESP32-WROOM instead of the CYD.
- CH340 driver: https://github.com/nodemcu/nodemcu-devkit/tree/master/Drivers
- CP210x driver: https://www.silabs.com/developers/usb-to-uart-bridge-vcp-drivers
Step 2: Upload the Firmware Into the ESP32


Yes, it’s the second step, and it’s time to upload the firmware into the ESP32.
To upload the firmware into the ESP2:
- Open the WebFlash page from the browser that supports the Web Serial API (Google Chrome, Microsoft Edge, Opera);
- Press the “CONNECT” button;
- In the pop-up window, select the COM port to which the ESP32 is connected and press the “Connect” button;
- In the form that appears in the middle of the screen, click on the “INSTALL MIDBAR ESP32 CYD FIREBASE EDITION” option;
- Regardless of whether you check “Erase device” or not, press the “NEXT” button;
- Wait for the firmware to be uploaded into the ESP32.
Just in case, here’s the actual WebFlash link: https://northstrix.github.io/Midbar-ESP32-CYD-Firebase-Edition/flash
*If you wish to compile the firmware yourself, you can get the source code at:
- SourceForge: https://sourceforge.net/projects/midbar-esp32-cyd-firebase/
- GitHub: https://github.com/Northstrix/Midbar-ESP32-CYD-Firebase-Edition
Step 3: Set Up Google Firebase

I would be happy to explain to you how to set up Google Firebase. However, I believe that the article at https://medium.com/firebase-developers/getting-started-with-esp32-and-firebase-1e7f19f63401 does a better job on that. I suggest reading the article up until the “Development Environment Setup” headline.
When setting up the database, save the “Realtime Database URL” and “Web API Key.”
These values will be needed later.
Step 4: Configure Midbar


Once you’ve configured the Google Firebase, return to the WebFlash page, click the “Connect” button, and click on the “LOGS & CONSOLE” line, reboot the ESP32 CYD when the serial terminal opens, paste into the serial terminal five required values, followed by the “Enter” press after each value, and then confirm the configuration by entering the “Y” character and pressing “Enter.” Reboot the device after configuring it.
Note that the “Iterations” variable defines the number of iterations for PBKDF2 (Password-Based Key Derivation Function 2). Though you can assign any value that’s more than 0 to this variable, I wouldn’t advise going above 100 000, as it would take the ESP32 a lot of time to derive the cryptographic keys.
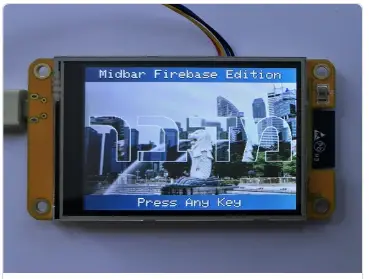
Step 5: Enjoy the Lock Screens


This version of Midbar displays two lock screens. The first one is shown when it initializes the Firebase, and the second one is displayed when it’s ready to go and just waiting for you to press any key.
Credit for photos:
Used as 320x190px lock screens:
Photo by Talena Reese from Pexels
Photo by Acton Crawford on Unsplash
Image by Volker Glätsch from Pixabay
Image by krystianwin from Pixabay
Photo by Alejandro Luengo on Unsplash
Photo by Morgan Petroski on Unsplash
Image by apriltan18 from Pixabay
Rome:
Photo by Nicole Reyes on Unsplash
Used as 320x240px lock screen:
Photo by Javier Quiroga on Unsplash
*As for the origin of the patterns (that you’ll encounter while using this device):
I made the 80x80px patterns myself. The flower patterns were generated by Bing Image Creator in December 2023.
You can view each pattern individually if you want.
- https://wokwi.com/projects/382246140542986241
- https://wokwi.com/projects/382260067255254017
- https://wokwi.com/projects/382260181271144449
- https://wokwi.com/projects/384520365948379137
- https://wokwi.com/projects/402932505040702465
Step 6: Assemble the Circuit

At that point, simply connect the PS/2 port to the board and plug a keyboard into it.
If the keyboard won’t work, try connecting it to the 5V (VIN pin).
Step 7: Set Master Password


To use the Midbar, you first need to set the master password.
You can’t change your master password without performing the factory reset first!
Midbar won’t be able to decrypt your data without your master password because the cryptographic keys are derived from it. Perhaps Midbar won’t even unlock without the correct master password.
When you’re done entering your master password, press either the “Enter” or the “ESC” key on the PS/2 keyboard.
After you’ve unlocked the vault and got to the main menu:
- Press the “↓” (DOWNWARDS ARROW) key on the PS/2 keyboard to go down the menu.
- Press the “↑” (UPWARDS ARROW) key on the PS/2 keyboard to go up the menu.
- Press either the “Enter” key on the PS/2 keyboard to open the selected menu.
- While in the submenu, press either the “Esc” or the “Backspace” key on the PS/2 keyboard to return to the main menu.
While entering a text in a tab:
- Press “Enter” on the PS/2 keyboard to continue.
- Press the “Esc” button on the PS/2 keyboard to cancel the current operation.
Step 8: Benefit From the Secure Data Storage


Midbar allows you to store the data of four types:
- Logins;
- Credit Cards;
- Notes;
- Phone Numbers.
This version of Midbar stores data in Google Firebase while retaining the cryptographic keys in the ESP32’s RAM.
It also comes with the HMAC-SHA256-based integrity verification feature that alerts you if the decrypted data is unauthentic or corrupt.
*All credentials demonstrated in this tutorial are entirely fictitious. Any similarity to actual credentials is purely coincidental.
Step 9: Configure the Desktop App

Aside from using the hardware password vault, you can also access your encrypted records from the dedicated desktop app. The desktop app, though convenient, may compromise the overall security of Midbar by exposing it to side-channel attacks. So, use it at your own risk.
*Modify the value in the “iterations = 20451” line of the “Launch Me.py” file if you’ve set the number of iterations for the pbkdf2 other than 20451.
I’ll explain how to configure the desktop app in the next two steps.
Step 10: Get the Firebase Private Key


To enable the desktop app to interact with the Firebase, you need to get the private key and place it in the same folder as the desktop (client) application.
To do so:
- Open your database;
- Click on the “Settings” icon;
- Click on the “Project settings” line;
- When the next tab loads, go to the “Service accounts” tab;
- Click the “Generate new private key” button;
- Click the “Generate key” button in the pop-up window;
- Save the private key to the “…V1.0\Desktop App” folder under the “firebase key.json” name.
Step 11: Add Database URL to the Desktop App

Navigate to the “…V1.0\Desktop App” folder, open the “db_url.txt” file, replace my database URL with yours, save the file and close it.
Step 12: Enjoy the Result

This version of Midbar offers you military-grade encryption (AES-256) combined with a sophisticated HMAC-SHA256-based integrity verification feature to encrypt your data and ensure its integrity and authenticity.
The fact that Midbar stores the encrypted data in the cloud while keeping the cryptographic keys in the device’s RAM enables you to simultaneously access your data from several devices without exposing it to third parties.
And thanks to the WebFlash feature, you don’t need to install the development environment and know how to code to set up the device.
That’s it for this tutorial.


