
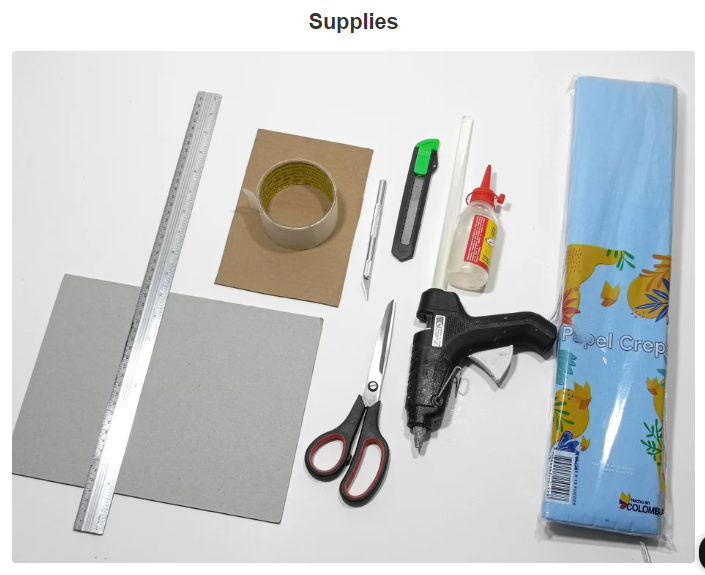
- Paper (Various colors and types)
- Cardboard
- Glue
- Hot Glue
- Contact cement
- Scissors
- X-acto
- Embosser
- Pencil
- Small plastic cups
- Respective templates and prints
- Marker
- Ruler
- Tape
Step 1: Paper & Cardboard

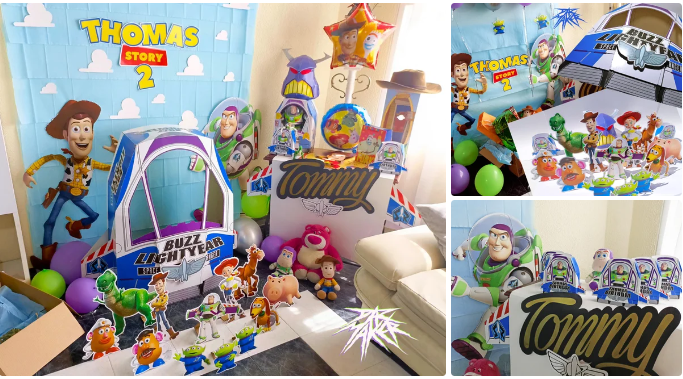
Paper and cardboard, often seen as mundane office supplies or recycling material, can seem uninspiring to some. However, in the right hands, these materials can be transformed from basic and ordinary into something extraordinary. Today, we will show you how to use paper and cardboard to organize and decorate a birthday party for children aged 1 to 3. By the end, you’ll see how these simple materials can create a magical and memorable celebration. So, let’s get started!
Step 2: Templates

For this project we will use some templates and printouts, which we will print and then transfer to different types of cardboard. so first of all we will have to download the templates.
The templates you will find in this tutorial come in tabloid size (279 × 432 mm / 11 x 17 inches) to print on paper (propalcote in my case) of 180 to 200 grams.
Step 3: Paper


To start this project, we will use various types of paper, but initially we will use light blue crepe paper to simulate the background color of Andy’s room.
This paper is semi-translucent, which means that the more layers underneath, the more solid its color will be.
Step 4: Big Buzz


5 More Images
For our decoration composition we will use 2 of the most emblematic characters of the franchise and we will start by assembling Buzz, the brave space guardian. And to assemble it I decided to create a system where the joints would be hidden during assembly, since I could not print the template on a large printer.
So what we’ll do is cut out the pieces on the templates and then join them together layer by layer like a puzzle.
Step 5: Big Woody


we will do the same with woody, Try to make each piece stick on its counterpart and try to give continuity with the layers, for example the gun case will be glued on top of the pants and not under them
Step 6: The Wall

3 More Images
For the wall we will use line after line of sheets of crepe paper.
First of all, unfold the strips of paper, and then with the help of the tape, stick them to the wall.
Step 7: Rows


Place the paper horizontally and calculate spaces between each layer of paper.
Now put row after row keeping a suitable distance, remember that if the background wall has any color it will influence the final curtain effect of the paper
Step 8: Assemble Wall


After covering the wall we will place our two giant-sized toys, position them well on the wall according to the dimensions of your wall. It may vary, but I recommend that you do so thinking about the height of your child.
In my case this is how it looks, Use the tape to stick the characters, cut small strips and stick them on the back
Step 9: Story Themed Title


Obviously, the famous Toy Story-style title couldn’t be missing, so I designed a title based on that style but of course, with my son’s name. I printed it in separate letters so that it could be placed centered on our blue canvas.
Step 10: The Toys

To decorate the floor and some tables I decided to print the most emblematic characters of Toy Story, so searching the web I found some images with good definition and others not so much which I had to rescale with the help of upscalers that work with AI https://www.iloveimg.com/upscale-image
In case you don’t like any of the images included in the templates you can choose your favorites, simply by searching for the character’s name in the most popular search engines.
Step 11: Cutting

Well, now that we have selected our favorites, What I did was scale them to the approximate screen sizes after this will proceed to cut them out. I used the scissors and left an extra white border for each character to set it apart and distinguish it from the others. You can print and cut out whichever ones you want. I have attached the main ones from the franchise to the templates. In the case of Rex and Buzz, they come with separate pieces that you will have to join together with glue just like we joined Buzz and Woody in the first steps.
Step 12: Toys Bases


Well, how do we keep our figures standing? Of course, we will create some cardboard bases so that they can stand on their own.
Cut strips of cardboard measuring 39 cm and make divisions of 13cm+10cm+16cm
Now join the two ends of the cardboard to create a triangular structure, and leaving a slight inclination, seal both sides.
Then if the character is tall like Jessie or Woody, with the help of a fast food stick, stick the base to it.
Now do the same with all the others.
Step 13: Rex Bullseye Ham


In the case of Bulseye Ha and Rex, since they are so large, what I recommend is making two bases, one on each leg.
Step 14: Clouds


Among the templates you will find a couple of clouds, based on the famous wallpaper in Andy’s room (these are optional if you want to fill the background a bit more)
What you need to do is cut out the original pattern that comes in the template and transfer it to cardstock as many times as you think necessary.
Step 15: Cake

To decorate the cake I also used paper obviously printed with our favorite characters plus an edit I made placing my son’s face on Buzz’s body, you can do this with any image editing program. So what we will do in this step is cut out miniature versions of the characters that we already cut in real size.
Step 16: Small Boxes

And for the candy bag for the invited children I decided to recreate the scene from the second movie where Buzz meets many Buzzs, so I designed a box that resembled what was seen on the screen.
Since there were few guests, I only made 6 boxes, but you can make the number that best suits your party.
For assembly we will proceed to cut the templates and with the help of an embosser we will mark the fold lines for the respective folds, use the help of a ruler to make some finer markings
Step 17: Centerpiece


I decided to make a centerpiece to contrast the importance of both characters. In this case, the centerpiece evokes the old design of Woody’s merchandising and to give it the high relief effect, I used a cardboard roll of toilet paper which I cut into several parts and placed under the repeated image to generate the relief.
Step 18: ZURG Mask


As an extra part of the party I wanted to wear a Zurg mask, since my son is Buzz, well, you know. “I am his father”
Zurg’s templates are more of a bonus for the project, but I’ll leave you with the process. The first thing I did was cut the pieces of paper and then join them together in the order in which they were to be placed, using an embosser where necessary for the most pronounced folds.
and gluing with conventional glue or heat gun glue
Step 19: ZURG Eyes


At the moment I was going to install Zurg’s eyes I noticed that the templates did not give him that evil personality in the eyes so I took a paper envelope which is made with a very bright reddish tone so I cut the piece and installed it inside, then doing tests with light I was fascinated by the effect it generated even for some thematic lamps it could work, what do you think?
Step 20: The Big Ship


We come to the most difficult and complex part of the project due to its size: Buzz’s spaceship. Here I wanted to make a giant version of Buzz’s box for my son’s photo studio and for it to also be part of the decoration.
In the first photo you can see the size comparison with the ZURG helmet
In order to design the perfect box faithful to the one shown in the film, I downloaded a lot of references from the film and existing boxes based on it.
I wanted it to have the correct fonts and to be 100% faithful to the one that appears in the first film.
so let’s get started. again.
Step 21: Ship Paper Templates


In this step we will cut all the pieces to assemble our ship and then we will join them to complete the large pieces, remember that due to the tabloid size there are parts that are distributed throughout the templates.
Step 22: Cardboard


Now to give rigidity to our ship we transfer our pieces to cardboard which will give it greater solidity
For this we will use contact cement, which we will apply to both back surfaces of the pieces we are going to join.
In order not to waste material, we also mark the indicated area where the glue will go.
Step 23: Rest of Pieces


Do the same with the rest of the pieces.
Step 24: Cut Cardboard


Now is the time to fill yourself with patience and some good sharp cutters to cut everything that we put on the cardboard, help yourself with the ruler to make straight and thin cuts
Step 25: Assembly


32 More Images
Now let’s put together our spaceship, well Buzz’s, with the hot glue gun we will start to join part by part, and with the help of some tabs made with leftover cardboard we will give more stability to the structure, in addition to serving as a grip between the pieces.
Step 26: Finished Space Ship

After putting the box together, we now have it ready for a phenomenal photo studio booth for our little boy and his guests.
Step 27: Conclusion


Now to finish the project, it remains as an experience that the best things you can give to a child are love and small moments that they will remember for their entire life, and that was the purpose of this project.
You can distribute the accessories made in this project in your space according to your criteria and creativity. I hope you enjoyed every step and if you succeed, let me know. Thanks for watching.
Step 28: Thanks for Watch.

Thanks 🙂
![]()


